
Easyling.com
Mobile App Localization - A Developer’s Illustrated Primer - Part 2

Sign up for our newsletter on globalization and localization matters.
In the first part of this series we looked at all the popular mobile app frameworks, and briefly described Flutter’s first-class support for quickly creating localized apps. Let us now examine this capability in more detail and discuss how it allows developers to move localization from an afterthought to something that’s built into the app from the outset. We’ll do that by looking at an actual localized application that caters to scuba divers looking for dive sites all around the world.
My goal with this article is to help you learn more about Flutter and its capabilities when it comes to localization, as well as how CI/CD best practices can be integrated into your development process to handle updates to your app content. We’ll do this by outlining the steps to achieve a translated version of your app with Flutter, and then take a look at how you can use continuous delivery to keep your translations up-to-date.
To keep in theme, let us dive into the code!
Localizing with Flutter
Broadly speaking, implementing localization in Flutter can be broken down into four steps (and a plus-one):
- Write the app
- Translate the content
- Build the app
- Enjoy the localized UI
- Handle updates
Of course, there are nuances to all of these, especially the first one.
In this section, we’ll take a look at the steps required to implement localization in a Flutter application, complete with code samples - from a real application, not some made up scenario! - so that you can see and understand the effort (or lack thereof) required to make an application localizable.
Writing a localizable app
Where other frameworks require lengthy preparation and boilerplate to enable localization, Flutter is now particularly streamlined in this regard.
Depend on Localization
Before you start writing localized content or wiring up Flutter’s built-in localization subsystem, the app must first declare a dependency on the feature. You do this in the project’s main configuration file - pubspec.yaml - by adding a reference to the library (and activating code generation) with just 3 lines of code:
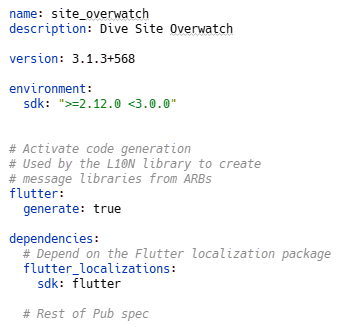
You’ll also need to configure the localization system. While there are many options to fine-tune the process, a minimalist approach can be taken with just three lines of configuration in a special file named l10n.yaml:

Initializing the Localization System
There is some preparation to do, most importantly declaring your supported locales so that Flutter knows what files it needs to load. This should really be done where you initialize your application UI, and the Flutter framework includes a whole set of dedicated properties for this purpose.
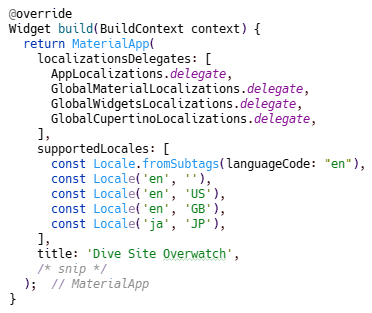
The practical upshot of this way of declaring your language support is that the Flutter toolchain will now check for the existence and validity of your localization files. If you forget to create even one of them, the build will fail and you won’t be able to release a partially-localized version of your cherished app.
Writing Content
Now that the localization subsystem is initialized, you need to write (or move out of your code) the content that will be displayed. Early on in the process, you do this by writing the ARB files directly, or by using third-party tools to extract your content. Because it is JSON at its core, ARB is fairly easy to write, and can be enhanced to include a variety of data for the translators handling it, from descriptions of the individual parts to parameter explanations, to even screenshots - using simple Base64 encoding - that other tools can read and display.

This means that the translators working on this content can be instructed on specific points in a way that isn’t always possible when working with other formats.
Reference Localized Content
Once you’ve written the ARB file, you need a way to display its content. You do this by referencing the keys of the ARB file in your app code.

If you used parametric strings - as I did for this filter button - you can pass the parameters for the string just like any other function parameter, making it very easy to construct even complicated sentences in a way that’s conducive to localization.
Build the Localized App
Now that you have the app wired up for localized display, all that remains to do is to build it. If you’ve followed the steps leading up to this point, all you need to do is run the build command ($ flutter build [ios|appbundle|web|macos|windows|linux]). If everything goes according to plan, you’ll have a fully localized application when the build runner finishes - or an error and a failed build if you’re missing one of the languages declared in your code, which ensures that you don’t accidentally miss one of them and release a partially-localized version.
Now all you have to do is ship the application to the stores, and start working on the next exciting feature.
Handling Updates
Of course, localization is not a one-time thing. Like each feature of the app, it needs to be maintained. With each feature, with each change, you’ll have new content to localize, your translators will need to keep track of said content, and your build process will need to incorporate the new translations into the packaged app.
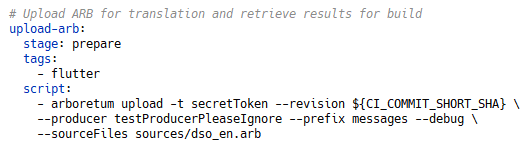
The practical upshot of Flutter’s approach to storing the localized content in separate files is that every change to the source or the translations creates a new commit, triggering your CI/CD process. With the proliferation of content connectors for source repositories and the easy processing of ARB files, integrating continuous translation into your regular CI/CD pipeline is hardly a challenge.
Handling the Localization
ARB Files
The Flutter framework uses ARB files to store its localizable content. ARB stands for Application Resource Bundle, a format created by Google to hold many forms of content in a single container, ready for locale-specific transformation.
Of particular note to developers is ARB’s ability to contain not only template strings - messages with placeholders that can be replaced at runtime - but also to defuse some of the more complicated issues of creating a localized app, such as plurals and gendered terms, which require notorious amounts of boilerplate code when hand-rolled (and are just as easy to get wrong).
Cultural Differences
In addition to the thorny issues of pluralization and gendered languages, one of the worst problems that plague front-end engineers when it comes to localization is the various cultural differences, such as text length and writing direction.
As an example of text expansion, consider the differences between an English source and its Japanese and German translations: where Japanese can be as little as 60% of the length of the original, German can be up to 130% the length. To give a deliberately extreme example, imagine a fictional rural retirement village for elderly government officials in the U.S, Japan, and Germany:
| US English | Japanese | German |
|---|---|---|
| Giving up service of the government and engaging in agriculture | 退耕 | Den Staatsdienst aufgeben und sich in der Landwirtschaft engagieren |
It’s easy to see how the three languages require vastly different layouts to accommodate the same concepts, effectively tripling the design and coding effort.
When it comes to text direction, it’s not hard to imagine just how many issues can arise when translating from English to the various Arabic dialects, and having to reverse the entire display. This includes not only the text direction, but also the relative positions of elements. An Arabic reader will expect a menu bar to go from right to left, not vice versa. Or, to give an even more extreme example, an application aimed at elderly Japanese might be best if displayed in tategaki (writing top-to-bottom right-to-left) which requires not only rotating the layout, but also flipping it from right to left.
Fortunately for the sanity of front-end developers, Flutter takes care of these issues natively. Its layout engine allows for fluid resizing and positioning of elements as text length changes, ensuring that - unless the developer actively works against the engine - the UI they create will look the same across all platforms, regardless of screen size or the content length. What’s more, because its engine is based on the concepts of main and cross axes, it’s relatively easy to manipulate element positions along those axes to ensure that your UI looks as good right-to-left as it does left-to-right. And when a right-to-left language is loaded, Flutter’s layout engine will automatically flip the direction of the main axis, so that an Arab user will see their culturally appropriate display being rendered in the correct order.
Conclusions
This was quite a journey through many topics, full of takeaways. If there’s one thing you, as a software engineer, take away from this article, let that be this: “Flutter as a framework is a safe, performant, and expressive system that allows fast and easy implementation of translations in new and existing apps”.
As a developer, you’ll benefit from the strongly-typed Dart language which is fast and expressive, while preventing whole classes of bugs that can ruin the experience. Dart is also cross-platform, able to run the same code (for the most part) across all computing platforms. It also works with you to build your UIs and protects you from localization failures by not allowing you to release versions with missing translations.
Do you want to contribute with an article, a blog post or a webinar?
We’re always on the lookout for informative, useful and well-researched content relative to our industry.

Zalan Meggyesi
Diplomat, scuba diver, translator, software developer. Graduated from Corvinus University of Budapest before turning to software development, Zalan has worked alongside translators and content creators in the localization industry for the last eight years at Easyling, sharpening the translation proxy’s capabilities to ever greater effect.